Friday, December 16, 2011

Gimp


I decided it was time I tried out Gimp properly. Gimp is a free open source photo editing software. It's pretty close to the older versions of Photoshop, although it being updated on a fairly regular basis, the version shown here is 2.6 (the latest at time of writing)
So how does it work, well it works very well, although I find it very slow compared to photoshop, it's also a lot more basic. Another issue is it's total lack of raw support, so no raw editing then.
That said it is FREE, and it does the job well, although a bit slower that it's £650 rival.

Friday, August 19, 2011

Plug-ins/scripts/actions

Photoshop has the ability to use add ons, theres
Actions, these are a sort of recording of the steps taken on one photo and played back on another image to get the same effect/style, you can either make your own, buy some or download some of the thousands of free ones available on the internet.

Scripts, these are a sort of more complicated version of an action, much much harder to write yourself (requires knowledge of scripting) but can do things that can't be done by an action.

Plug-ins, these are normally made by others, often big companies and are most often bought (although there are some free ones about) these usually open a new interface and offer all kinds of effects, from sharpening or black and white, to complicated lens correction or high dynamic range.


Thursday, June 23, 2011

Photoshop v Lightroom

Which is best for you?
Both is the easy answer. What are the real world differences? Well lightroom does a few things to a lot of images while photoshop does a lot of things to a few images.

Lightroom is really designed to manage and edit your images, but it only has limited editing, theres no layers, no cutting and pasting, limited cloning and healing (poor IMHO) Limited localised ajustment. But what it does have is good colour and exposure editing, and it does batches of images well, something photoshop with all it's amazing features still manages to make difficult.

For me I need both, I use Lightroom for large numbers of images, say a wedding where most of whats needed is a quick tweek to colour exposure, and Photoshop for the tricky stuff like cloning or removing objects from the background, swopping eyes, stuff like that, things Lightroom simply can't do.

Tuesday, May 10, 2011

Backing up your images.

Now today I'm going to talk about backing up your images. If you haven't already got them backed up now is the time to do it.
I would suggest you have at least TWO different back-ups, don't rely on any one system. I use two external hard drives and dvd's to back up too, ideally one set kept off site (your mums house/work/even the shed) anything that separates it from the house or office so if you have a flood or fire you still have your images.
Why do we need to back up? Simply because all hard drives will fail at some point, they might last for years or they might last days, sadly theres no real way to tell. I have had quite a few either fail totally or get killed by virus's over the years, luckly I keep everything backed up so this far I have been lucky. I do know a few people who have lost all their images because a drive has failed, don't think it can't happen to you.

Saturday, May 7, 2011

Resizing in photoshop


A question I often here asked is how do I resize my images for the internet or whatever.

Well heres how.
Open your image in photoshop, go to image/ image size here I wanted 700 pixles on the longest size (the height) the box that opens has the following options, first I made sure it was on pixles, then I checked that scale styles, resample and constrain proportions were all ticked, now I type in 700 on the longest size.
The next step is to choose the resample method, as I'm going smaller it's bicubic sharper, if I was going bigger than the original it would be bicubis smoother (it tells you) Lastly click ok and the jobs done.

Just remember to save as portrait small (or whatever) so you don't save over your original and loose the full size version.

Thursday, May 5, 2011

Sharpening your image.


There's a lot of ways of sharpening your image with photoshop, but first we'll talk a bit about a work flow.
Some people favor a 3 step sharpening work flow.
Step 1. is a capture sharpen, this is a mild sharpen usually in camera raw, this is a mild sharpen to replace the sharpening lost by the AA filter on the camera sensor (this stage is usually not needed with jpeg which tend to have in-camera sharpening)
Step 2. Creative sharpening, this is where just part of the image is sharpened for effect, say the eyes in a portrait, or that big rock in the foreground in a landscape.
Step 3. Output sharpening, this is the final sharpen and will vary depending on size and whether it's for web or print.
Note all sharpening should be done viewing the image at 100%, photoshop doesn't display images correctly at other sizes as far as sharpening and noise reduction are concerned.

On to the sharpening, in the raw converter I have applied a little bit of sharpening, then opened the image in photoshop proper.
First I create a duplicate layer, (layer/duplicate layer), next I go to filter/other/high pass, this turns your image a horrid grey, don't worry it's supposed to look like that at this stage, now adjust the radius until you can see the edges of your image, now it's going to vary with image size and content but somewhere between about 5-10 should do it.
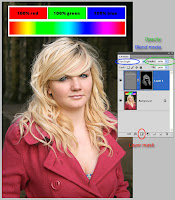
Now open your layers palette if it's not open (window/layers) now on the top grey layer in a box at the top you'll see the word normal, this is the layer blend mode, click the little downward arrow and change it to hard light, now your image suddenly looks sharp.
Now if you wanted to sharpen the whole image at this stage just adjust the opacity (next to where you changed to overlay) until it looks as sharp as you want and flatten the layer (layer/flatten)
If on the other hand you wanted to selectively sharpen on your layers palette is a layer mask icon (grey square with a white circle in it) first make sure your on the top layer (the hard light one) now hold down the ALT key and click the layer mask button, this creates a mask that hides all the top layer, now click the brush tool, choose white as a foreground colour (on the colour boxes on the left toolbar D on the keyboard will reset them) now paint in the bits you want sharp, say the eyes in this image, I then lowered the opacity and gave the hair a run over to pull out the detail a bit. Finally adjust the opacity until your happy.
The last stage is to resize your image and add a bit of sharpening to suit the output, again this will vary with size and if it's for web ot print.

Welcome

This is the first post on my Photoshop tips Blog.